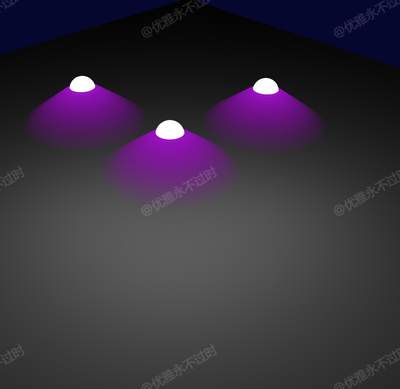
灯罩 · Lampshade · ▶ 在线运行案例
案例合集: 三维可视化功能案例(threehub.cn)
开源仓库github地址: https://github.com/z2586300277/three-cesium-examples
**400个案例代码: ** 网盘链接
你将学到什么
- ShaderMaterial 自定义着色器实现核心视觉效果
- OrbitControls 相机轨道交互
requestAnimationFrame渲染循环与resize自适应
效果说明
本案例演示 灯罩 效果:基于 WebGL 实现「灯罩」可视化效果,附完整可运行源码;核心用到 ShaderMaterial、OrbitControls。建议先打开文首在线案例查看动态画面,再对照下方源码逐步理解。
核心概念
- Scene / Camera / WebGLRenderer 构成最小渲染闭环;大场景可开
logarithmicDepthBuffer缓解 Z-fighting。 - ShaderMaterial 通过
uniforms+ 自定义 GLSL 控制逐像素/逐点效果;透明粒子常配合depthTest: false。 - OrbitControls 提供轨道旋转/缩放;开启
enableDamping后需在 animate 中controls.update()。
实现步骤
- 创建 OrbitControls 并处理 resize
- 定义 uniforms,在 rAF 中更新并 render
- 搭建灯光与环境(如有)
- requestAnimationFrame 循环 update + render
代码要点
import {
  Color,
  CylinderGeometry,
  Group,
  Mesh,
  MeshBasicMaterial,
  MeshStandardMaterial,
  PerspectiveCamera,
  PlaneGeometry,
  PointLight,
  Scene,
  ShaderMaterial,
  SphereGeometry,
  WebGLRenderer
} from 'three'
import { OrbitControls } from 'three/examples/jsm/controls/OrbitControls.js'

const size = { width: window.innerWidth, height: window.innerHeight }
const scene = new Scene()
scene.background = new Color('#070630')

const camera = new PerspectiveCamera(45, size.width / size.height, 0.1, 1000)
camera.position.set(30, 30, 30)

const renderer = new WebGLRenderer({ antialias: true })
renderer.setSize(size.width, size.height)
renderer.setPixelRatio(window.devicePixelRatio)
document.body.appendChild(renderer.domElement)

const controls = new OrbitControls(camera, renderer.domElement)

class DeskLamp extends Group {
  constructor() {
    super()
    this.#createWick()
    this.#createLampshade()
  }

  /**灯芯*/
  #createWick() {
    const geometry = new SphereGeometry(1, 32, 16, 0, Math.PI * 2, 0, Math.PI / 2)
    const material = new MeshBasicMaterial({ color: 0xffffff })
    const sphere = new Mesh(geometry, material)
    sphere.position.set(0, 3, 0)
    this.#createLight(sphere)
    this.add(sphere)
  }

  /**灯罩*/
  #createLampshade() {
    const cylinderGeometry = new CylinderGeometry(1, 5, 3, 32)
    const cylinderMaterial = new ShaderMaterial({
      transparent: true,
      uniforms: {
        color: { value: new Color('#CB00E3') }
      },
      vertexShader: `
      varying vec2 vUv;
      void main() {
        vUv = uv;
        gl_Position = projectionMatrix * modelViewMatrix * vec4(position, 1.0);
      }
    `,
      fragmentShader: `
      uniform vec3 color;
      varying vec2 vUv;
      void main() {
        gl_FragColor = vec4(color, vUv.y);
      }
    `
    })
    const cylinder = new Mesh(cylinderGeometry, cylinderMaterial)
    cylinder.position.set(0, 1.7, 0)
    this.add(cylinder)
  }

  /**点光源*/
  #createLight(mesh) {
    const pointLight = new PointLight(0xffffff, 1, 100)
    pointLight.power = 1000
    mesh.add(pointLight)
  }
}

const light1 = new DeskLamp()
light1.position.set(0, 10, 0)
scene.add(light1)

const light2 = new DeskLamp()
light2.position.set(10, 10, 0)
scene.add(light2)

const light3 = new DeskLamp()
light3.position.set(0, 10, 10)
scene.add(light3)

/**
 * 创建地面
 * */
const planeGeometry = new PlaneGeometry(100, 100)
const planeMaterial = new MeshStandardMaterial({
  color: 0x999999,
  side: 2
})
const plane = new Mesh(planeGeometry, planeMaterial)
plane.rotation.x = -Math.PI / 2
scene.add(plane)

animate()
function animate() {

  renderer.render(scene, camera)
  requestAnimationFrame(animate)
}
完整源码:GitHub
小结
- 本文提供 灯罩 完整 Three.js 源码与在线 Demo,建议先运行案例再改 uniform/参数做二次实验
- 更多 Three.js 实战案例见 three-cesium-examples 合集 与 GitHub 开源仓库