场景雪 · sceneSnowEffect · ▶ 在线运行案例
案例合集: 三维可视化功能案例(threehub.cn)
开源仓库github地址: https://github.com/z2586300277/three-cesium-examples
**400个案例代码: ** 网盘链接
你将学到什么
- ShaderMaterial 自定义着色器实现核心视觉效果
- OrbitControls 相机轨道交互
- THREE.Points 粒子点渲染
- glTF/Draco 模型加载与优化
- BufferGeometry 自定义顶点/索引数据
requestAnimationFrame渲染循环与resize自适应
效果说明
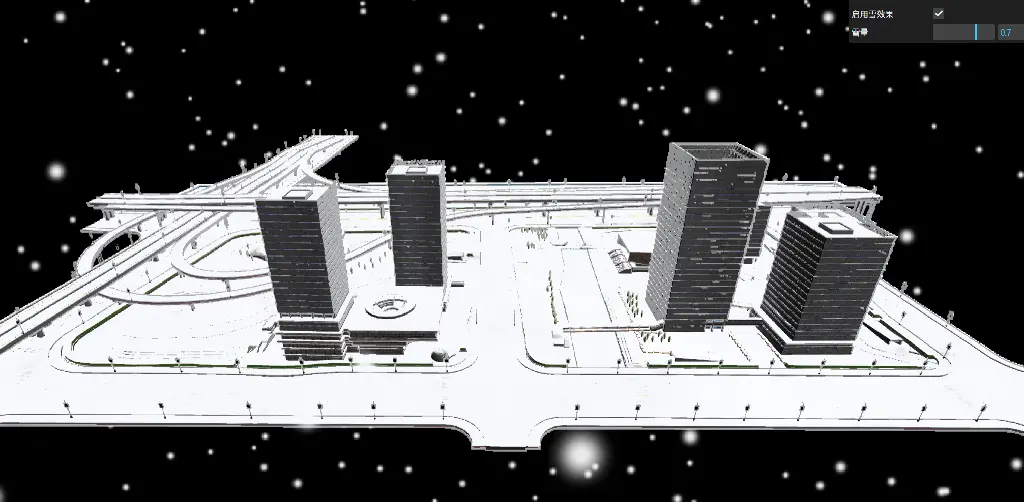
本案例演示 场景雪 效果:基于 WebGL 实现「场景雪」可视化效果,附完整可运行源码;核心用到 ShaderMaterial、OrbitControls、THREE.Points。建议先打开文首在线案例查看动态画面,再对照下方源码逐步理解。
核心概念
- Scene / Camera / WebGLRenderer 构成最小渲染闭环;大场景可开
logarithmicDepthBuffer缓解 Z-fighting。 - ShaderMaterial 通过
uniforms+ 自定义 GLSL 控制逐像素/逐点效果;透明粒子常配合depthTest: false。 - OrbitControls 提供轨道旋转/缩放;开启
enableDamping后需在 animate 中controls.update()。 - THREE.Points 将每个顶点渲染为可控大小的粒子;可用自定义 attribute(如
u_index)驱动片元/顶点动画。
实现步骤
- 搭建 Scene、PerspectiveCamera、WebGLRenderer,挂载 canvas 并处理
resize - 异步加载模型 / 3D Tiles / GeoJSON 等资源并加入 scene 或 entities
- 定义 uniforms / onBeforeCompile 或 ShaderMaterial,编写 GLSL 与材质参数
- 创建 OrbitControls(及 Raycaster 等交互控件,若源码包含)
- 在
requestAnimationFrame循环中更新状态并 render(Cesium 为viewer.render或自动渲染)
代码要点
import * as THREE from 'three';
import Stats from 'three/examples/jsm/libs/stats.module.js';
import {GLTFLoader} from "three/examples/jsm/loaders/GLTFLoader.js";
import {OrbitControls} from 'three/examples/jsm/controls/OrbitControls.js'
import {DRACOLoader} from "three/examples/jsm/loaders/DRACOLoader.js";
import {GUI} from "three/addons/libs/lil-gui.module.min.js"
console.log('Three.js 版本:', THREE.REVISION);
const gui = new GUI()
const size = { width: window.innerWidth, height: window.innerHeight, maxX: 20, minX: -20, maxY: 20, minY: 0, maxZ: 20, minZ: -20 }
const vertices = []
const offset = []
let particleCount=1000
const geometry = new THREE.BufferGeometry()
for (let i = 0; i < particleCount; i++) {
    const x = 1000 * (Math.random() - 0.5)
    const y = 600 * Math.random()
    const z = 1000 * (Math.random() - 0.5)

    vertices.push(x, y, z)
    offset.push(Math.random() - 0.5, 0, Math.random() - 0.5)
}
geometry.setAttribute('position', new THREE.Float32BufferAttribute(vertices, 3))
/**纹理*/
const texture = new THREE.TextureLoader().load(HOST + 'files/images/snow.png')
const pointMesh = new THREE.Points(
    geometry,
    new THREE.PointsMaterial({
        size: 5,
        depthTest: true,
        map: texture,
        transparent: true,
        blending: THREE.AdditiveBlending,
        opacity: 0.8,
        sizeAttenuation: true
    })
)
// 创建一个控制对象
const params = {
    snowEnabled: true,  // 默认值为true
    snowAmount: 0.7
};

//后处理管理对象
const postprocessing = {}

// 添加GUI控制
const folder = gui.addFolder('调节参数');
// 添加checkbox
folder.add(params, 'snowEnabled').name('启用雪效果').onChange((value) => {
    params.snowEnabled = value;
});
folder.add(params, "snowAmount", 0, 1, 0.01).name('雪量').onChange((value) => {
    postprocessing.finalMaterial.uniforms.snowAmount.value = value;
});


// 初始化场景、相机、渲染器
const scene = new THREE.Scene();
const camera = new THREE.PerspectiveCamera(75, window.innerWidth / window.innerHeight, 0.1, 10000);
camera.position.set(0, 100, 300); // 明确设置相机初始位置
camera.lookAt(0, 0, 0); // 看向场景中心
scene.add(camera);
const renderer = new THREE.WebGLRenderer({
    antialias: true,
    alpha: true,
    logarithmicDepthBuffer: true
});
renderer.outputColorSpace = 'srgb'
renderer.setSize(window.innerWidth, window.innerHeight);
renderer.setClearColor(0x000000);
document.body.appendChild(renderer.domElement);

const ambientLight = new THREE.AmbientLight('#fff', 2);
scene.add(ambientLight);
scene.add(pointMesh);
// 添加性能监控
const stats = new Stats();
document.body.appendChild(stats.dom);
// 初始化控制器
const controls = new OrbitControls(camera, renderer.domElement);
controls.enableDamping = true;


const gltfLoader = new GLTFLoader()
const dracoLoader = new DRACOLoader()
dracoLoader.setDecoderPath(FILE_HOST + 'js/three/draco/')
gltfLoader.setDRACOLoader(dracoLoader)
//加载模型 使用私有对象存储带宽较低耐心等待一下
// "http://app.foxicle.xyz:9000/public-bucket/model/city/index.gltf"
gltfLoader.load(FILE_HOST + 'models/modern_city.glb', (gltf) => {
    gltf.scene.scale.set(0.01, 0.01, 0.01);
    scene.add(gltf.scene)
}, (event) => {
    const percentComplete = (event.loaded / event.total * 100).toFixed(2);
    console.log(`模型加载进度: ${percentComplete}%`);
});


initPostprocessing(window.innerWidth, window.innerHeight)


function updatePoints(){
    for (let i = 1; i < vertices.length; i += 3) {
        vertices[i] -= 0.5
        vertices[i - 1] -= offset[i - 1]
        vertices[i + 1] -= offset[i + 1]
        if (vertices[i] < 0) {
            vertices[i] = 600
        }

        if (vertices[i - 1] < size.minX || vertices[i - 1] > size.maxX) {
            offset[i - 1] = -offset[i - 1]
        }

        if (vertices[i + 1] < size.minZ || vertices[i + 1] > size.maxZ) {
            offset[i + 1] = -offset[i + 1]
        }
    }

    pointMesh.geometry.setAttribute('position', new THREE.Float32BufferAttribute(vertices, 3))
}


// 动画渲染
function animate() {
    requestAnimationFrame(animate)

    if (params.snowEnabled) {
        pointMesh.visible=true
        updatePoints()
        scene.overrideMaterial = null
        //写入原场景渲染图
        renderer.setRenderTarget(postprocessing.difusse)
        renderer.render(scene, camera)
        // //将定点数据 法相数据存入通道
        scene.overrideMaterial = postprocessing.gBufferPass
        renderer.setRenderTarget(postprocessing.gBuffer)
        renderer.render(scene, camera)
        renderer.setRenderTarget(null)
        renderer.render(postprocessing.scene, postprocessing.camera);
    } else {
        pointMesh.visible=false
        scene.overrideMaterial = null
        renderer.setRenderTarget(null)
        renderer.render(scene, camera)
    }
    stats.update()
    controls.update()
}

animate();

/**
 * 核心逻辑,备注:对场景中部分透明物体渲染存在错误,需要额外处理,这里主要是提供思路
 * @param renderTargetWidth
 * @param renderTargetHeight
 */
function initPostprocessing(renderTargetWidth, renderTargetHeight) {
    postprocessing.scene = new THREE.Scene();
    postprocessing.camera = new THREE.OrthographicCamera(-1, 1, 1, -1, 0, 1);
    postprocessing.scene.add(postprocessing.camera);
    //漫射
    postprocessing.difusse = new THREE.WebGLRenderTarget(renderTargetWidth, renderTargetHeight, {
        format: THREE.RGBAFormat,
        type: THREE.FloatType,
        colorSpace: THREE.SRGBColorSpace,
        depthBuffer: true,
        samples: 4,
        minFilter: THREE.NearestFilter,
        magFilter: THREE.NearestFilter,
        stencilBuffer: false,
    })
    postprocessing.gBuffer = new THREE.WebGLRenderTarget(renderTargetWidth, renderTargetHeight, {
        format: THREE.RGBAFormat, // 使用 RGBAFormat 确保有 alpha 通道
        type: THREE.FloatType, // 使用 FloatType 以确保存储精度
        depthBuffer: true, // 确保有深度缓冲
        samples: 4,
        count: 2
    })

    // G-BUFFER 管线
    postprocessing.gBufferPass = new THREE.ShaderMaterial({
        vertexShader: `
        out vec3 vNormal;
        out vec3 vWorldPosition;
        void main() {
            vNormal = normal;
            // 计算顶点的世界坐标,模型矩阵将顶点从模型空间转换到世界空间
            vec4 worldPosition = modelMatrix * vec4(position, 1.0);
            vWorldPosition = worldPosition.xyz;
            gl_Position = projectionMatrix * viewMatrix * worldPosition;
        }
    `,
        fragmentShader: `
        in vec3 vNormal;
        in vec3 vWorldPosition;
        layout(location = 0) out vec4 gPosition;
        layout(location = 1) out vec4 gNormal;
        void main() {
          gPosition = vec4(vWorldPosition, 1.0);
          gNormal = normalize(vec4(vNormal, 1.0));
      }
    `,
        glslVersion: '300 es'
    })

    postprocessing.finalMaterial = new THREE.ShaderMaterial({
        defines: {
            EMISSIVE: 10,
        },
        vertexShader: `
    out vec2 vUv;
    void main() {
        vUv = uv;
        gl_Position = projectionMatrix * viewMatrix * modelMatrix * vec4(position, 1.0);
    }
  `,
        fragmentShader: `
        precision highp float;
        precision highp int;

        uniform sampler2D tPosition;
        uniform sampler2D tNormal;
        uniform sampler2D tDiffuse;
        uniform vec2 resolution;
        uniform float time;
        uniform vec3 uCameraPosition;
        uniform float snowAmount;
        uniform float snowNoise;
        uniform float snowEdge;

        in vec2 vUv;
        out vec4 fragColor;

        // 改进的噪声函数
        float rand(vec2 co) {
            return fract(sin(dot(co.xy, vec2(12.9898, 78.233))) * 43758.5453);
        }

        float noise(vec2 p) {
            vec2 ip = floor(p);
            vec2 fp = fract(p);
            float a = rand(ip);
            float b = rand(ip + vec2(1.0, 0.0));
            float c = rand(ip + vec2(0.0, 1.0));
            float d = rand(ip + vec2(1.0, 1.0));
            vec2 u = fp * fp * (3.0 - 2.0 * fp);
            return mix(a, b, u.x) +
            (c - a) * u.y * (1.0 - u.x) +
            (d - b) * u.x * u.y;
        }

        float fbm(vec2 p) {
            float total = 0.0;
            float amplitude = 1.0;
            for (int i = 0; i < 4; i++) {
                total += noise(p) * amplitude;
                p *= 2.0;
                amplitude *= 0.5;
            }
            return total;
        }

        void main() {
            // 从G-Buffer读取数据
            vec3 position = texture(tPosition, vUv).rgb;
            vec3 normal = normalize(texture(tNormal, vUv).rgb);
            vec4 diffuseSample = texture(tDiffuse, vUv);
            vec3 diffuse = diffuseSample.rgb;
            if (diffuseSample.a<0.01) discard;

            // 计算积雪因子 - 基于法线Y分量
            float snowFactor = max(0.0, dot(normal, vec3(0.0, 1.0, 0.0)));
            snowFactor = pow(snowFactor, 3.0);// 增强对比度

            // 添加噪声效果
            vec2 noiseCoord = position.xz * 0.5 + vec2(time * 0.05);
            float noiseVal = fbm(noiseCoord);
            snowFactor = clamp(snowFactor + (noiseVal - 0.5) * snowNoise, 0.0, 1.0);
            snowFactor *= snowAmount;

            // 边缘积雪增强
            vec2 texelSize = 1.0 / resolution;
            float depthCenter = texture(tPosition, vUv).z;
            float depthRight = texture(tPosition, vUv + vec2(texelSize.x, 0.0)).z;
            float depthBottom = texture(tPosition, vUv + vec2(0.0, texelSize.y)).z;
            float depthDiff = max(abs(depthCenter - depthRight), abs(depthCenter - depthBottom));
            snowFactor = max(snowFactor, smoothstep(0.0, 0.1, depthDiff) * snowEdge);

            // 雪的颜色 - 使用更纯的白色,减少蓝色调
            vec3 snowColor = mix(vec3(0.95, 0.96, 0.98), vec3(1.0), noiseVal * 0.2);

            // 最终颜色混合 - 使用更激进的混合
            vec3 finalColor = mix(diffuse, snowColor, smoothstep(0.3, 0.7, snowFactor));

            // 修改高光效果 - 更柔和、更白的高光
            if (snowFactor > 0.3) {
                vec3 lightDir = normalize(vec3(1.0, 1.0, 1.0));
                vec3 viewDir = normalize(uCameraPosition - position);
                vec3 halfDir = normalize(lightDir + viewDir);
                float spec = pow(max(0.0, dot(normal, halfDir)), 32.0);
                // 使用白色高光,强度降低
                finalColor += spec * 0.1 * vec3(1.0) * snowFactor;
            }

            // 提高整体亮度
            finalColor = mix(finalColor, vec3(1.0), snowFactor * 0.3);

            fragColor = vec4(finalColor, 1.0);
        }`,
        glslVersion: '300 es',
        uniforms: {
            tPosition: {value: postprocessing.gBuffer.textures[0]},
            tNormal: {value: postprocessing.gBuffer.textures[1]},
            tDiffuse: {value: postprocessing.difusse.texture},
            resolution: {value: new THREE.Vector2(window.innerWidth, window.innerHeight)},
            time: {value: 0},
            uCameraPosition: {value: new THREE.Vector3()},  // 对应着色器中的重命名
            snowAmount: {value: 0.7},
            snowNoise: {value: 0.3},
            snowEdge: {value: 0.5}
        },
    });
    postprocessing.quad = new THREE.Mesh(
        new THREE.PlaneGeometry(2.0, 2.0),
        postprocessing.finalMaterial
    );
    postprocessing.scene.add(postprocessing.quad);

}

// 窗口大小调整
window.addEventListener('resize', onWindowResize, false);

function onWindowResize() {
    camera.aspect = window.innerWidth / window.innerHeight;
    camera.updateProjectionMatrix();
    renderer.setSize(window.innerWidth, window.innerHeight);
}
完整源码:GitHub
小结
- 本文提供 场景雪 完整 Three.js 源码与在线 Demo,建议先运行案例再改 uniform/参数做二次实验
- 更多 Three.js 实战案例见 three-cesium-examples 合集 与 GitHub 开源仓库