自带几何体顶点 · Vertices · ▶ 在线运行案例
案例合集: 三维可视化功能案例(threehub.cn)
开源仓库github地址: https://github.com/z2586300277/three-cesium-examples
**400个案例代码: ** 网盘链接
你将学到什么
- 内置几何体底层都是
BufferGeometry geometry.attributes.position的结构:Float32Array + itemSize- 细分参数(widthSegments 等)如何影响顶点数量
效果说明
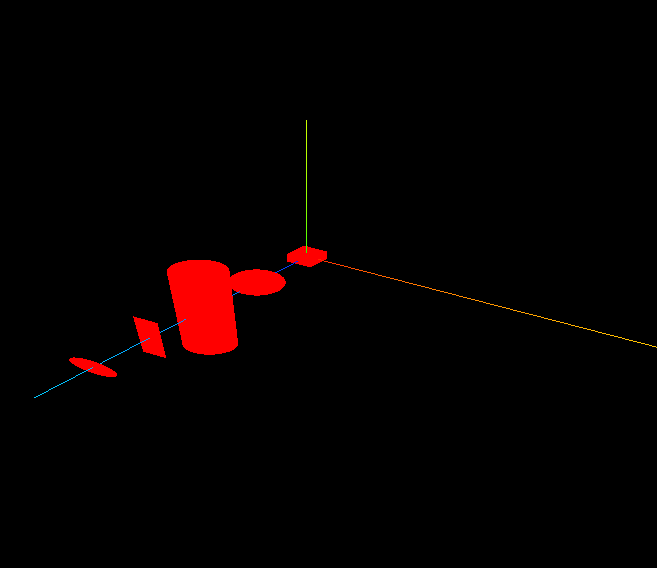
与 几何体 类似,展示多种形状;区别在于通过 console.log 输出各几何体的 顶点属性数据,理解「形状 = 顶点集合」。
核心概念
Three.js r125+ 全面使用 BufferGeometry,顶点存在 GPU 友好的 TypedArray 中:
geometry.attributes.position
  ├── array: Float32Array  [x0,y0,z0, x1,y1,z1, ...]
  ├── itemSize: 3          每个顶点 3 个分量 (x,y,z)
  └── count: N             顶点个数 = array.length / itemSize
细分(Segments) 将曲面拆成更多三角面:
// PlaneGeometry(宽, 高, 宽分段, 高分段)
const geometry4 = new THREE.PlaneGeometry(10, 50, 10, 10);
// 10×10 细分 → 更多顶点 → 可做位移/波浪等顶点动画
| 几何体 | 细分参数 | 顶点数趋势 |
|---|---|---|
| BoxGeometry | 无(固定 24 顶点) | 恒定 |
| SphereGeometry | widthSegments, heightSegments | 分段↑ → 顶点↑ |
| PlaneGeometry | widthSegments, heightSegments | 分段↑ → 顶点↑ |
实现步骤
- 创建多种 Geometry(注意 Plane 带细分参数)
- 分别
console.log(geometry.attributes.position)对比 - 创建 Mesh 加入场景,OrbitControls 交互
代码要点
import * as THREE from 'three';
import { OrbitControls } from 'three/examples/jsm/controls/OrbitControls.js'

// 场景
const scene = new THREE.Scene();// 创建场景
//BoxGeometry:长方体
const geometry1 = new THREE.BoxGeometry(10, 10, 10);
// SphereGeometry:球体
const geometry2 = new THREE.SphereGeometry(10);
// CylinderGeometry:圆柱
const geometry3 = new THREE.CylinderGeometry(10, 10, 100);

// PlaneGeometry:矩形平面
// 几何体细分数
const geometry4 = new THREE.PlaneGeometry(10, 50, 10, 10);
// CircleGeometry:圆形平面
const geometry5 = new THREE.CircleGeometry(10);

const material = new THREE.MeshBasicMaterial({ color: 0xff0000 }); //材质

const mesh1 = new THREE.Mesh(geometry1, material);
mesh1.position.set(0, 0, 0);
const mesh2 = new THREE.Mesh(geometry2, material);
mesh2.position.set(0, 0, 30);
const mesh3 = new THREE.Mesh(geometry3, material);
mesh3.position.set(0, 0, 60);
const mesh4 = new THREE.Mesh(geometry4, material);
mesh4.position.set(0, 0, 90);
const mesh5 = new THREE.Mesh(geometry5, material);
mesh5.position.set(0, 0, 120);

scene.add(mesh1);
scene.add(mesh2);
scene.add(mesh3);
scene.add(mesh4);
scene.add(mesh5);

console.log('顶点位置数据', geometry1);
console.log('顶点位置数据', geometry1.attributes.position);
console.log('顶点位置数据', geometry2.attributes.position);
console.log('顶点位置数据', geometry3.attributes.position);
console.log('顶点位置数据', geometry4.attributes.position);
console.log('顶点位置数据', geometry5.attributes.position);


// AxesHelper
const axesHelper = new THREE.AxesHelper(150);
scene.add(axesHelper);

// 相机
const camera = new THREE.PerspectiveCamera();  //相机
camera.position.set(400, 300, 500); //相机位置
camera.lookAt(0, 50, 40);   //相机观察位置

// 渲染器
const renderer = new THREE.WebGLRenderer(); // 创建渲染器
const box = document.getElementById('box');
renderer.setSize(box.clientWidth, box.clientHeight); //渲染区域
renderer.render(scene, camera); //执行渲染
box.appendChild(renderer.domElement);;


// 设置相机控件轨道控制器OrbitControls
const controls = new OrbitControls(camera, renderer.domElement);
// 如果OrbitControls改变了相机参数,重新调用渲染器渲染三维场景
controls.addEventListener('change', function () {
        renderer.render(scene, camera); //执行渲染操作
        console.log(camera.position)
});//监听鼠标、键盘事件
完整源码:GitHub
小结
- 本文提供 自带几何体顶点 完整 Three.js 源码与在线 Demo,建议先运行案例再改 uniform/参数做二次实验
- 更多 Three.js 实战案例见 three-cesium-examples 合集 与 GitHub 开源仓库