雪花 · Snow · ▶ 在线运行案例
案例合集: 三维可视化功能案例(threehub.cn)
开源仓库github地址: https://github.com/z2586300277/three-cesium-examples
**400个案例代码: ** 网盘链接
你将学到什么
- onBeforeCompile 注入 GLSL 改造内置材质
- OrbitControls 相机轨道交互
- BufferGeometry 自定义顶点/索引数据
- 监听窗口
resize同步更新 camera 与 renderer
效果说明
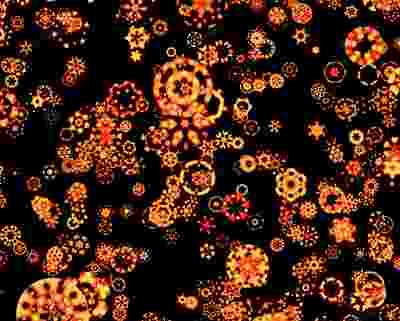
本案例演示 雪花 效果:基于 WebGL 实现「雪花」可视化效果,附完整可运行源码;核心用到 onBeforeCompile、OrbitControls、BufferGeometry。建议先打开文首在线案例查看动态画面,再对照下方源码逐步理解。
核心概念
- Scene / Camera / WebGLRenderer 构成最小渲染闭环;大场景可开
logarithmicDepthBuffer缓解 Z-fighting。 - onBeforeCompile 在 Three 拼好内置 shader 后替换
#include <xxx>片段,适合在 PBR 材质上叠加大屏特效。 - OrbitControls 提供轨道旋转/缩放;开启
enableDamping后需在 animate 中controls.update()。
实现步骤
- 搭建 Scene、PerspectiveCamera、WebGLRenderer,挂载 canvas 并处理
resize - 定义 uniforms / onBeforeCompile 或 ShaderMaterial,编写 GLSL 与材质参数
- 创建 OrbitControls(及 Raycaster 等交互控件,若源码包含)
- 在
requestAnimationFrame循环中更新状态并 render(Cesium 为viewer.render或自动渲染)
代码要点
import * as THREE from "three";
import { OrbitControls } from "three/addons/controls/OrbitControls.js";

let scene = new THREE.Scene();
let camera = new THREE.PerspectiveCamera(45, innerWidth / innerHeight, 0.1, 1000);
camera.position.set(0, 0, 7);
let renderer = new THREE.WebGLRenderer();
renderer.setSize(innerWidth, innerHeight);
document.body.appendChild(renderer.domElement);
window.addEventListener("resize", event => {
  camera.aspect = innerWidth / innerHeight;
  camera.updateProjectionMatrix();
  renderer.setSize(innerWidth, innerHeight);
})

new OrbitControls(camera, renderer.domElement);


let gu = {
  time: {value: 0}
}

class Flakes extends THREE.Points{
  constructor(gu){
    let flakeData = [];
    let g = new THREE.BufferGeometry().setFromPoints(new Array(1000).fill().map(_ => {
      flakeData.push(((Math.random() < 0.5) ? -1 : 1), 0, 0, 0);
      return new THREE.Vector3().random().subScalar(0.5).multiplyScalar(10)
    }));
    g.setAttribute("flakeData", new THREE.Float32BufferAttribute(flakeData, 4));
    let m = new THREE.PointsMaterial({
      color: 0xfbec5d,
      size: 0.75,
      onBeforeCompile: shader => {
        shader.uniforms.time = gu.time;
        shader.vertexShader = `
          uniform float time;
          attribute vec4 flakeData;
          varying vec4 vFlakeData;
          varying float vId;
          ${shader.vertexShader}
        `.replace(
          `#include <begin_vertex>`,
          `#include <begin_vertex>
          vId = float(gl_VertexID);
          vFlakeData = flakeData;

          vec3 p = vec3(position);

          transformed.y = 5. - mod(p.y + time * 0.5 - 5., 10.);


          `
        );

        shader.fragmentShader = `
          uniform float time;
          varying vec4 vFlakeData;
          varying float vId;

          // 2D Random
          float random (in vec2 st) {
              return fract(sin(dot(st.xy,
                                   vec2(12.9898,78.233)))
                           * 43758.5453123);
          }

          // 2D Noise based on Morgan McGuire @morgan3d
          // https://www.shadertoy.com/view/4dS3Wd
          float noise (in vec2 st) {
              vec2 i = floor(st);
              vec2 f = fract(st);

              // Four corners in 2D of a tile
              float a = random(i);
              float b = random(i + vec2(1.0, 0.0));
              float c = random(i + vec2(0.0, 1.0));
              float d = random(i + vec2(1.0, 1.0));

              // Smooth Interpolation

              // Cubic Hermine Curve.  Same as SmoothStep()
              vec2 u = f*f*(3.0-2.0*f);
              // u = smoothstep(0.,1.,f);

              // Mix 4 coorners percentages
              return mix(a, b, u.x) +
                      (c - a)* u.y * (1.0 - u.x) +
                      (d - b) * u.x * u.y;
          }

          mat2 rot(float a){
            float c = cos(a);
            float s = sin(a);
            return mat2(c, -s, s, c);
          }

          ${shader.fragmentShader}
        `.replace(
          `#include <clipping_planes_fragment>`,
          `#include <clipping_planes_fragment>
          vec2 baseUv = gl_PointCoord.xy - 0.5;
          vec2 uv = rot(mod(vId + (time * vFlakeData.x), PI2)) * (baseUv * 10.);
          float a = atan(uv.y, uv.x) + PI;
          float r = length(uv);
          float aStep = PI / 3.;
          float aPart = abs(mod(a, aStep) - (0.5 * aStep));
          vec2 suv = vec2(cos(aPart), sin(aPart)) * r - vec2(time, 0.);
          float n = noise(suv + vId);
          //n = pow(n, 2.);
          if (length(baseUv) > 0.5 || n < 0.5) discard;
          `
        ).replace(
          `#include <color_fragment>`,
          `#include <color_fragment>
            diffuseColor.rgb = mix(diffuseColor.rgb, vec3(0.875, 0, 0), smoothstep(1., 0.5, n));
          `
        );
        console.log(shader.fragmentShader);
      }
    })
    super(g, m);
  }
}
let flakes = new Flakes(gu);
scene.add(flakes);

let clock = new THREE.Clock();

renderer.setAnimationLoop(() => {
  gu.time.value = clock.getElapsedTime() * 0.5;
  renderer.render(scene, camera);
});
完整源码:GitHub
小结
- 本文提供 雪花 完整 Three.js 源码与在线 Demo,建议先运行案例再改 uniform/参数做二次实验
- 更多 Three.js 实战案例见 three-cesium-examples 合集 与 GitHub 开源仓库