科技粒子 · Technology · ▶ 在线运行案例
案例合集: 三维可视化功能案例(threehub.cn)
开源仓库github地址: https://github.com/z2586300277/three-cesium-examples
**400个案例代码: ** 网盘链接
你将学到什么
- onBeforeCompile 注入 GLSL 改造内置材质
- OrbitControls 相机轨道交互
- THREE.Points 粒子点渲染
- BufferGeometry 自定义顶点/索引数据
requestAnimationFrame渲染循环与resize自适应
效果说明
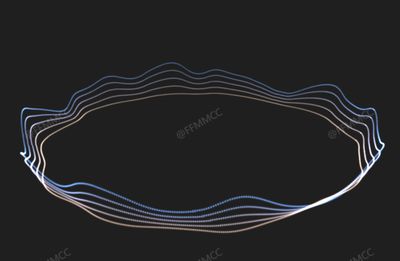
本案例演示 科技粒子 效果:基于 WebGL 实现「科技粒子」可视化效果,附完整可运行源码;核心用到 onBeforeCompile、OrbitControls、THREE.Points。建议先打开文首在线案例查看动态画面,再对照下方源码逐步理解。
核心概念
- Scene / Camera / WebGLRenderer 构成最小渲染闭环;大场景可开
logarithmicDepthBuffer缓解 Z-fighting。 - onBeforeCompile 在 Three 拼好内置 shader 后替换
#include <xxx>片段,适合在 PBR 材质上叠加大屏特效。 - OrbitControls 提供轨道旋转/缩放;开启
enableDamping后需在 animate 中controls.update()。 - THREE.Points 将每个顶点渲染为可控大小的粒子;可用自定义 attribute(如
u_index)驱动片元/顶点动画。
实现步骤
- 搭建 Scene、PerspectiveCamera、WebGLRenderer,挂载 canvas 并处理
resize - 定义 uniforms / onBeforeCompile 或 ShaderMaterial,编写 GLSL 与材质参数
- 创建 OrbitControls(及 Raycaster 等交互控件,若源码包含)
- 在
requestAnimationFrame循环中更新状态并 render(Cesium 为viewer.render或自动渲染)
代码要点
import * as THREE from 'three'
import { OrbitControls } from 'three/examples/jsm/controls/OrbitControls.js'

const box = document.getElementById('box')

const scene = new THREE.Scene()

const camera = new THREE.PerspectiveCamera(50, box.clientWidth / box.clientHeight, 0.1, 1000)

camera.position.set(0, 10, 25)

const renderer = new THREE.WebGLRenderer({ antialias: true, alpha: true, logarithmicDepthBuffer: true })

renderer.setSize(box.clientWidth, box.clientHeight)

box.appendChild(renderer.domElement)

new OrbitControls(camera, renderer.domElement)

const curve = new THREE.EllipseCurve(0, 0, 8, 8, 0, 2 * Math.PI, false, 0);
let pointsPos = [];

for (let i = 0; i < 5; i++) {
    pointsPos.push(...curve.getPoints(719));
    curve.xRadius += 0.2;
    curve.yRadius += 0.2;
}

const aIndex = pointsPos.map((_, index) => index);
const geometry = new THREE.BufferGeometry().setFromPoints(pointsPos);

geometry.rotateX(Math.PI * 0.5);
geometry.translate(0, 0.1, 2.5);

const geoPosList = geometry.getAttribute('position').array;
const aNormals = new Float32Array(geoPosList.length);

for (let i = 0; i < geoPosList.length / 3; i++) {

    const i3 = i * 3;
    geoPosList[i3 + 1] += Math.floor(i / 720) * 0.15;
    const baseIndex = (i % 720) * 3;
    const offsetIndex = ((i % 720) + 720 * 4) * 3;
    aNormals[i3] = geoPosList[offsetIndex] - geoPosList[baseIndex];
    aNormals[i3 + 1] = geoPosList[offsetIndex + 1] - geoPosList[baseIndex + 1];
    aNormals[i3 + 2] = geoPosList[offsetIndex + 2] - geoPosList[baseIndex + 2];

}

geometry.setAttribute('aNormal', new THREE.BufferAttribute(aNormals, 3));
geometry.setAttribute('aIndex', new THREE.BufferAttribute(new Float32Array(aIndex), 1));
geometry.setAttribute('position', new THREE.BufferAttribute(new Float32Array(geoPosList), 3));

const pointsMaterial = new THREE.PointsMaterial({
    color: 0x409eff,
    size: 0.4,
    map: new THREE.TextureLoader().load(FILE_HOST + 'images/texture/circle.png'),
    alphaMap: new THREE.TextureLoader().load(FILE_HOST + 'images/texture/circle.png'),
    transparent: true,
    depthWrite: false,
    blending: THREE.AdditiveBlending,
});

const uTime = { value: 0 };
pointsMaterial.onBeforeCompile = ((shader) => {

    shader.uniforms.uTime = uTime
    shader.uniforms.uPerlinTexture = { value: new THREE.TextureLoader().load(FILE_HOST + 'images/texture/noise.png') };
    shader.uniforms.baseColor1 = { value: new THREE.Color(0x90EE90) };
    shader.uniforms.baseColor2 = { value: new THREE.Color(0xFFA500) };
    shader.uniforms.baseColor3 = { value: new THREE.Color(0x9B30FF) };
    shader.vertexShader = shader.vertexShader.replace("#include <common>",
    `#include <common>
    attribute float aIndex;
    attribute vec3 aNormal;
    uniform float uTime;
    uniform sampler2D uPerlinTexture;
    varying float vIndex;
    varying float vSelfIndex;
    varying float vCircleNum;

    float getStrength(float aIndex,float uTime,vec3 aNormal){
            float selfIndex = mod(aIndex, 720.0);      // 计算每个点在圆环上的位置索引
            float circleNum = (aIndex - selfIndex) / 720.0; // 计算点所在的“圈号”,但此值目前未使用

            vec3 pDir = normalize(aNormal);            // 获取法线方向,后续将用其调整偏移方向
            float waveWidth = 90.0;                    // 波动效果的宽度
            float totalLength = 720.0;                 // 圆的总长度(720度)
            float modUtime = mod(uTime * 50.0, 720.0); // 时间的循环,乘以 30.0 是加速效果
            float dw = waveWidth*0.5;              // 平滑过渡的宽度,控制波动的范围

            // 计算波动强度
            // 对首尾连接部分(0 和 720)进行平滑过渡处理
            float smoothStart = smoothstep(modUtime , modUtime+dw, selfIndex);
            float smoothEnd = 1.0-smoothstep(modUtime+waveWidth - dw,modUtime+waveWidth, selfIndex);

            // 创建平滑连接:确保波动在 [720 - dw, 720 + waveWidth] 和 [0, dw] 区间内平滑过渡
            float strength = min(smoothStart,smoothEnd);


            float isOver=step(720.0,modUtime+waveWidth);
            float over=(modUtime+waveWidth-720.0);
            float isOverStep1=(1.0-step(dw,over))*isOver;
            float isOverStep2=step(dw,over);

            float overStep1Left=min(smoothstep(modUtime,modUtime+dw,selfIndex),(1.0-smoothstep(modUtime+waveWidth - dw,modUtime+waveWidth, selfIndex)));
            float overStep1Right=1.0-smoothstep(modUtime+waveWidth - dw,modUtime+waveWidth, selfIndex+720.0);
            float overStep1=max(overStep1Left,overStep1Right);

            float overStep2Left=smoothstep(modUtime,modUtime+dw,selfIndex);
            float overStep2Right=min(smoothstep(modUtime,modUtime+dw,selfIndex+720.0),(1.0-smoothstep(modUtime+waveWidth - dw,modUtime+waveWidth, selfIndex+720.0)));
            float overStep2=max(overStep2Left,overStep2Right);

            float os=isOverStep1*overStep1+overStep2*isOverStep2;

            strength=(1.0-isOver)*strength+isOver*os;
            return strength;
        }
    `
    );

    shader.vertexShader = shader.vertexShader.replace(
        "#include <begin_vertex>",
        /* glsl */ `
           #include <begin_vertex>
               float selfIndex = mod(aIndex, 720.0);
             float circleNum = (aIndex - selfIndex) / 720.0;
            vec3 pDir = normalize(aNormal);

            float noise=texture(uPerlinTexture,vec2((selfIndex/720.0),mod(uTime*0.1,1.0))).r;

            float strength=getStrength(aIndex,uTime,aNormal);
                strength+=getStrength(aIndex,uTime+10.0+noise,aNormal);
                strength+=getStrength(aIndex,uTime+20.0+noise,aNormal);
                strength+=getStrength(aIndex,uTime+30.0+noise,aNormal);
                strength+=getStrength(aIndex,uTime+40.0+noise,aNormal);
                strength+=getStrength(aIndex,uTime+50.0+noise,aNormal);
                strength+=getStrength(aIndex,uTime+60.0+noise,aNormal);
                strength+=getStrength(aIndex,uTime+70.0+noise,aNormal);
                strength+=getStrength(aIndex,uTime+80.0+noise,aNormal);
                strength+=getStrength(aIndex,uTime+90.0+noise,aNormal);
                             // 偏移的强度因子,当前没有动态变化

                // 基于法线方向和波动强度偏移点的 x 和 z 坐标
                transformed.x += pDir.x * strength*0.5;
                transformed.z += pDir.z* strength*0.5;
                    transformed.y += strength*circleNum*noise*0.6 ;
                //transformed.y +=strength * circleNum*0.08;


            vIndex = aIndex; // 将索引传递给片段着色器(或者用于调试)
    `
    );

    shader.fragmentShader = shader.fragmentShader.replace(
        "#include <common>",
        /* glsl */ `

         varying float vIndex;

          uniform float uTime;
          uniform vec3 baseColor1;
          uniform sampler2D uPerlinTexture;
          uniform vec3 baseColor2;
          uniform vec3 baseColor3;
        #include <common>
    `
    );

    shader.fragmentShader = shader.fragmentShader.replace(
        "vec4 diffuseColor = vec4( diffuse, opacity );",
        /* glsl */ `
        vec3 whiteColor = vec3( 1.0,1.0,1.0);
        float selfIndex=mod(vIndex,720.0);
        float circleNum=(vIndex - selfIndex)/720.0;
        //float nuo=mod(uTime*0.2,1.0);
        vec3  baseColor=mix(baseColor1,baseColor2,mod(uTime*0.1,1.0));
         baseColor=mix(baseColor,baseColor3,mod(uTime*0.2,1.0));
        vec3 finalColor=mix(baseColor,diffuse,circleNum/5.0);
        finalColor*=1.0;
        vec4 diffuseColor = vec4( finalColor, opacity );
    `
    );
})

const points = new THREE.Points(geometry, pointsMaterial);
scene.add(points);

animate()

function animate() {

    uTime.value += 0.01
    requestAnimationFrame(animate)
    renderer.render(scene, camera)

}
完整源码:GitHub
小结
- 本文提供 科技粒子 完整 Three.js 源码与在线 Demo,建议先运行案例再改 uniform/参数做二次实验
- 更多 Three.js 实战案例见 three-cesium-examples 合集 与 GitHub 开源仓库