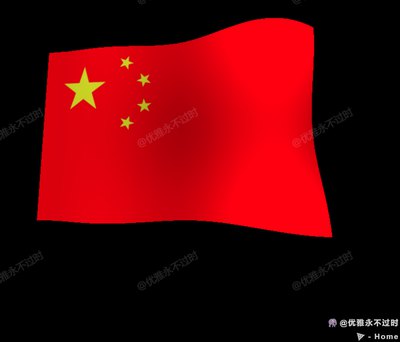
中国旗帜 · China Flag · ▶ 在线运行案例
案例合集: 三维可视化功能案例(threehub.cn)
开源仓库github地址: https://github.com/z2586300277/three-cesium-examples
**400个案例代码: ** 网盘链接
你将学到什么
- RawShaderMaterial 手写完整 GLSL(含 projectionMatrix 等)
- 高细分 BoxGeometry 当旗面
- 多频率 sin 叠加 Z 向波浪 + 杆边 xFactor 衰减
vDark传递位移量做片元明暗
效果说明
本案例演示 中国旗帜 效果:基于 WebGL 实现「中国旗帜」可视化效果,附完整可运行源码;核心用到 RawShaderMaterial、OrbitControls。建议先打开文首在线案例查看动态画面,再对照下方源码逐步理解。
核心概念
顶点波浪
float xFactor = clamp((modelPosition.x + 1.25) / 2.0, 0.0, 2.0);
float vWave = sin(modelPosition.x * uFrequency.x - uTime) * xFactor * uStrength;
vWave += sin(modelPosition.y * uFrequency.y - uTime) * xFactor * uStrength * 0.5;
modelPosition.z += vWave;
xFactor 让靠近旗杆(x 较小)顶点几乎不动。
片元明暗
textColor.rgb *= vDark + 0.85;
波浪隆起处 vDark 较大,颜色略亮/略暗形成褶皱感。
RawShaderMaterial
需自行声明 attribute / uniform mat4 projectionMatrix 等;不自动注入 Three chunk。
实现步骤
- TextureLoader 加载国旗 JPG
- BoxGeometry(3, 2, 0.025, 64, 64) 高细分
- uniforms:
uTime、uFrequency、uStrength、uTexture - animate 里
uTime += 0.06
代码要点
import * as THREE from 'three'
import { OrbitControls } from 'three/examples/jsm/controls/OrbitControls.js'

const box = document.getElementById('box')

const scene = new THREE.Scene()

const camera = new THREE.PerspectiveCamera(75, box.clientWidth / box.clientHeight, 0.1, 1000)

camera.position.set(0.5, -0.5, 3)

const renderer = new THREE.WebGLRenderer()

renderer.setSize(box.clientWidth, box.clientHeight)

box.appendChild(renderer.domElement)

new OrbitControls(camera, renderer.domElement)

window.onresize = () => {

    renderer.setSize(box.clientWidth, box.clientHeight)

    camera.aspect = box.clientWidth / box.clientHeight

    camera.updateProjectionMatrix()

}

const flagTexture = new THREE.TextureLoader().load(GLOBAL_CONFIG.getFileUrl("images/chinaFlag.jpg"))

const flagMaterial = new THREE.RawShaderMaterial({

    vertexShader: `uniform mat4 projectionMatrix;
        uniform mat4 modelMatrix;
        uniform mat4 viewMatrix;
        uniform vec2 uFrequency;
        uniform float uTime;
        uniform float uStrength;
        attribute vec3 position;
        attribute vec2 uv;
        varying float vDark;
        varying vec2 vUv;
        void main() {
            vec4 modelPosition = modelMatrix * vec4(position, 1.0);
            float xFactor = clamp((modelPosition.x + 1.25) / 2.0, 0.0, 2.0);
            float vWave = sin(modelPosition.x * uFrequency.x - uTime ) * xFactor * uStrength ;
            vWave += sin(modelPosition.y * uFrequency.y - uTime) * xFactor * uStrength * 0.5;
            modelPosition.y += sin(modelPosition.x * 2.0 + uTime * 0.5) * 0.05 * xFactor;
            modelPosition.z += vWave;
            vec4 viewPosition = viewMatrix * modelPosition;
            vec4 projectedPosition = projectionMatrix * viewPosition;
            gl_Position = projectedPosition;
            vUv = uv;
            vDark = vWave;
        }`,

    fragmentShader: `precision mediump float;
        varying float vDark;
        uniform sampler2D uTexture;
        varying vec2 vUv;
        void main(){
            vec4 textColor = texture2D(uTexture, vUv);
            textColor.rgb *= vDark + 0.85;
            gl_FragColor = textColor;
        }`,

    side: THREE.DoubleSide,

    uniforms: {

        uFrequency: { value: new THREE.Vector2(3, 3) },

        uTime: { value: 0 },

        uTexture: { value: flagTexture },

        uStrength: { value: 0.2 }

    }

})

const flagGeometry = new THREE.BoxGeometry(3, 2, 0.025, 64, 64)

const flagMesh = new THREE.Mesh(flagGeometry, flagMaterial)

scene.add(flagMesh)

animate()

function animate() {

    flagMaterial.uniforms.uTime.value += 0.06

    renderer.render(scene, camera)

    requestAnimationFrame(animate)

}
完整源码:GitHub
小结
- 本文提供 中国旗帜 完整 Three.js 源码与在线 Demo,建议先运行案例再改 uniform/参数做二次实验
- 更多 Three.js 实战案例见 three-cesium-examples 合集 与 GitHub 开源仓库