城市光影 · City Light · ▶ 在线运行案例
案例合集: 三维可视化功能案例(threehub.cn)
开源仓库github地址: https://github.com/z2586300277/three-cesium-examples
**400个案例代码: ** 网盘链接
你将学到什么
- onBeforeCompile 注入 GLSL 改造内置材质
- OrbitControls 相机轨道交互
- FBXLoader 加载 FBX 城市/角色模型
- glTF/Draco 模型加载与优化
- GSAP 时间轴与补间动画
效果说明
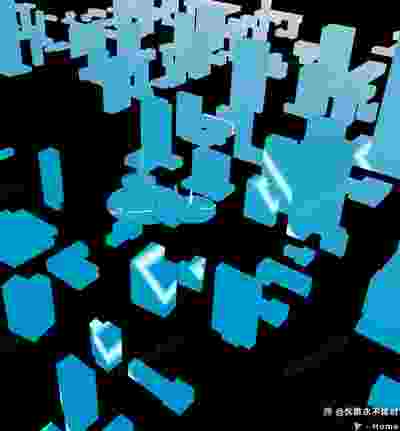
本案例演示 城市光影 效果:建筑/模型随进度生长,叠加扫光、扩散波等大屏 Shader 特效;核心用到 onBeforeCompile、OrbitControls、FBXLoader。建议先打开文首在线案例查看动态画面,再对照下方源码逐步理解。
核心概念
- Scene / Camera / WebGLRenderer 构成最小渲染闭环;大场景可开
logarithmicDepthBuffer缓解 Z-fighting。 - onBeforeCompile 在 Three 拼好内置 shader 后替换
#include <xxx>片段,适合在 PBR 材质上叠加大屏特效。 - OrbitControls 提供轨道旋转/缩放;开启
enableDamping后需在 animate 中controls.update()。
实现步骤
- 搭建 Scene、PerspectiveCamera、WebGLRenderer,挂载 canvas 并处理
resize - 异步加载模型 / 3D Tiles / GeoJSON 等资源并加入 scene 或 entities
- 定义 uniforms / onBeforeCompile 或 ShaderMaterial,编写 GLSL 与材质参数
- 创建 OrbitControls(及 Raycaster 等交互控件,若源码包含)
- 在定时器或 GSAP 时间轴中更新 uniform / 变换,驱动特效播放
- 在
requestAnimationFrame循环中更新状态并 render(Cesium 为viewer.render或自动渲染)
代码要点
import * as THREE from 'three'
import { OrbitControls } from 'three/examples/jsm/controls/OrbitControls.js'
import { GLTFLoader } from 'three/examples/jsm/loaders/GLTFLoader.js'
import { DRACOLoader } from 'three/examples/jsm/loaders/DRACOLoader.js'
import { FBXLoader } from 'three/examples/jsm/loaders/FBXLoader.js'
import gsap from 'gsap'

const size = {
    width: window.innerWidth,
    height: window.innerHeight
}
const scene = new THREE.Scene()
const camera = new THREE.PerspectiveCamera(45, size.width / size.height, 0.1, 1000)
camera.position.set(5, 5, 5)
const renderer = new THREE.WebGLRenderer({ antialias: true, logarithmicDepthBuffer: true })
renderer.setSize(size.width, size.height)
renderer.setPixelRatio(window.devicePixelRatio * 1.5)
document.body.appendChild(renderer.domElement)
new OrbitControls(camera, renderer.domElement)
renderer.setAnimationLoop(() =>  renderer.render(scene, camera))

//加载gltf
const dracoLoader = new DRACOLoader()
dracoLoader.setDecoderPath(FILE_HOST + 'js/three/draco/')
dracoLoader.preload()
const loader = new GLTFLoader()
loader.setDRACOLoader(dracoLoader)
loader.load(FILE_HOST + 'models/glb/build.glb', (gltf) => {
    const model = gltf.scene
    model.scale.set(0.01, 0.01, 0.01)
    scene.add(model)
    model.traverse((child) => {
        if (child instanceof THREE.Mesh) {
            child.material.dispose()
            child.material = modifyMaterial()
        }
    })
})

// fbx
new FBXLoader().load(HOST + '/files/model/city.FBX', (object3d) => {
    scene.add(object3d)
    object3d.scale.set(0.001, 0.001, 0.001)
    object3d.traverse((child) => {
        if (child instanceof THREE.Mesh) {
            child.material.dispose()
            child.material = modifyMaterial()
        }
    })
})

//混合着色
function modifyMaterial() {
    const material = new THREE.MeshBasicMaterial({
        color: '#28A1CC',
        // wireframe: true,
        opacity: 0.2,
        transparent: true,
        side: THREE.DoubleSide
    })
    material.onBeforeCompile = (shader) => {
        shader.fragmentShader = shader.fragmentShader.replace(/#include <dithering_fragment>/, `#include <dithering_fragment> //替换标记`)
        addColor(shader)
        addWave(shader)
        addLightLine(shader)
        addToTopLine(shader)
    }
    return material
}

//
function addColor(shader) {
    //   获取物体的高度差
    const uHeight = 1200

    shader.uniforms.uTopColor = {
        value: new THREE.Color('#e9eaef')
    }
    shader.uniforms.uHeight = {
        value: uHeight
    }

    shader.vertexShader = shader.vertexShader.replace(
        '#include <common>',
        `
      #include <common>
      varying vec3 vPosition;
      `
    )

    shader.vertexShader = shader.vertexShader.replace(
        '#include <begin_vertex>',
        `
      #include <begin_vertex>
      vPosition = position;
  `
    )

    shader.fragmentShader = shader.fragmentShader.replace(
        '#include <common>',
        `
      #include <common>

      uniform vec3 uTopColor;
      uniform float uHeight;
      varying vec3 vPosition;

        `
    )
    shader.fragmentShader = shader.fragmentShader.replace(
        '//替换标记',
        `

      vec4 distGradColor = gl_FragColor;

      // 设置混合的百分比
      float gradMix = vPosition.y/uHeight;
      // 计算出混合颜色
      vec3 gradMixColor = mix(distGradColor.xyz,uTopColor,gradMix);
      gl_FragColor = vec4(gradMixColor,1);
        //替换标记

      `
    )
}

/**
 *添加扩散波
 * */
function addWave(shader) {
    // 设置扩散的中心点
    shader.uniforms.uSpreadCenter = { value: new THREE.Vector2(0, 0) }
    //   扩散的时间
    shader.uniforms.uSpreadTime = { value: -2000 }
    //   设置条带的宽度
    shader.uniforms.uSpreadWidth = { value: 40 }

    shader.fragmentShader = shader.fragmentShader.replace(
        '#include <common>',
        `
      #include <common>

      uniform vec2 uSpreadCenter;
      uniform float uSpreadTime;
      uniform float uSpreadWidth;
      `
    )

    shader.fragmentShader = shader.fragmentShader.replace(
        '//替换标记',
        `
     float spreadRadius = distance(vPosition.xz,uSpreadCenter);
    //  扩散范围的函数
    float spreadIndex = -(spreadRadius-uSpreadTime)*(spreadRadius-uSpreadTime)+uSpreadWidth;

    if(spreadIndex>0.0){
        gl_FragColor = mix(gl_FragColor,vec4(1,1,1,1),spreadIndex/uSpreadWidth);
    }

    //替换标记
    `
    )

    gsap.to(shader.uniforms.uSpreadTime, {
        value: 800,
        duration: 3,
        ease: 'none',
        repeat: -1
    })
}

function addLightLine(shader) {
    //   扩散的时间
    shader.uniforms.uLightLineTime = { value: -1500 }
    //   设置条带的宽度
    shader.uniforms.uLightLineWidth = { value: 200 }

    shader.fragmentShader = shader.fragmentShader.replace(
        '#include <common>',
        `
        #include <common>


        uniform float uLightLineTime;
        uniform float uLightLineWidth;
        `
    )

    shader.fragmentShader = shader.fragmentShader.replace(
        '//替换标记',
        `
      float LightLineMix = -(vPosition.x+vPosition.z-uLightLineTime)*(vPosition.x+vPosition.z-uLightLineTime)+uLightLineWidth;

      if(LightLineMix>0.0){
          gl_FragColor = mix(gl_FragColor,vec4(0.8,1.0,1.0,1),LightLineMix /uLightLineWidth);

      }

      //替换标记
      `
    )

    gsap.to(shader.uniforms.uLightLineTime, {
        value: 1500,
        duration: 5,
        ease: 'none',
        repeat: -1
    })
}

function addToTopLine(shader) {
    //   扩散的时间
    shader.uniforms.uToTopTime = { value: 0 }
    //   设置条带的宽度
    shader.uniforms.uToTopWidth = { value: 40 }

    shader.fragmentShader = shader.fragmentShader.replace(
        '#include <common>',
        `
          #include <common>


          uniform float uToTopTime;
          uniform float uToTopWidth;
          `
    )

    shader.fragmentShader = shader.fragmentShader.replace(
        '//替换标记',
        `
        float ToTopMix = -(vPosition.y-uToTopTime)*(vPosition.y-uToTopTime)+uToTopWidth;

        if(ToTopMix>0.0){
            gl_FragColor = mix(gl_FragColor,vec4(0.8,0.8,1,1),ToTopMix /uToTopWidth);

        }

        //替换标记
        `
    )

    gsap.to(shader.uniforms.uToTopTime, {
        value: 500,
        duration: 3,
        ease: 'none',
        repeat: -1
    })
}
完整源码:GitHub
小结
- 本文提供 城市光影 完整 Three.js 源码与在线 Demo,建议先运行案例再改 uniform/参数做二次实验
- 更多 Three.js 实战案例见 three-cesium-examples 合集 与 GitHub 开源仓库