颗粒图像 · Image Part · ▶ 在线运行案例
案例合集: 三维可视化功能案例(threehub.cn)
开源仓库github地址: https://github.com/z2586300277/three-cesium-examples
**400个案例代码: ** 网盘链接
你将学到什么
- OrbitControls 相机轨道交互
- BufferGeometry 自定义顶点/索引数据
requestAnimationFrame渲染循环与resize自适应
效果说明
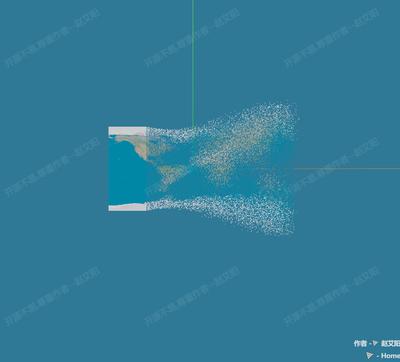
本案例演示 颗粒图像 效果:基于 WebGL 实现「颗粒图像」可视化效果,附完整可运行源码;核心用到 OrbitControls、BufferGeometry。建议先打开文首在线案例查看动态画面,再对照下方源码逐步理解。
核心概念
OrbitControls 轨道旋转缩放;开
enableDamping时每帧需controls.update()。CubeTexture 六面贴图作
scene.background;scene.environment供 PBR 材质反射。
实现步骤
- 搭建 Scene / Camera / Renderer 与 OrbitControls
- rAF 循环中 update 并 render
代码要点
import * as THREE from 'three'
import { OrbitControls } from 'three/examples/jsm/controls/OrbitControls.js'

// 创建渲染器对象
var renderer = new THREE.WebGLRenderer();
renderer.setSize(window.innerWidth, window.innerHeight);
renderer.setPixelRatio(window.devicePixelRatio); // 设置像素比
document.body.appendChild(renderer.domElement); //body元素中插入canvas对象

// 创建场景对象
var scene = new THREE.Scene();
scene.background = new THREE.Color("#347897");

// 创建相机
const far = 500000;
const camera = new THREE.PerspectiveCamera(75, window.innerWidth / window.innerHeight, 0.1, far);
camera.position.set(0, 0, 300);

// 点光源
var point = new THREE.PointLight("#fff", 1);
point.position.set(140, 200, 300); // 点光源位置
scene.add(point); // 点光源添加到场景中

// 环境光
var ambient = new THREE.AmbientLight("#fff", 2);
scene.add(ambient);

// 添加辅助线
const axisHelper = new THREE.AxesHelper(500);
scene.add(axisHelper);

// 创建控制器
const controls = new OrbitControls(camera, renderer.domElement);
//controls.autoRotate = true;

// 渲染
requestAnimationFrame(function render() {
    requestAnimationFrame(render);
    controls.update(); // Update controls
    renderer.render(scene, camera);
});

// 创建几何体
const width = 200; // 宽度
const height = 100; // 高度
const positionArr = []; // 顶点
const normalArr = []; // 法线
const uvArr = []; // uv
const geometry = new THREE.PlaneGeometry(width, height, 1 * width, 1 * height);
Array.from(geometry.index.array).forEach((vertexIndex) => {
    let tArr = geometry.attributes.position.array;
    let i = vertexIndex * 3;
    positionArr.push(tArr[i], tArr[i + 1], tArr[i + 2]); // 顶点

    tArr = geometry.attributes.normal.array;
    i = vertexIndex * 3;
    normalArr.push(tArr[i], tArr[i + 1], tArr[i + 2]); // 法线

    tArr = geometry.attributes.uv.array;
    i = vertexIndex * 2;
    uvArr.push(tArr[i], tArr[i + 1]); // uv
});
let bufferGeometry = new THREE.BufferGeometry(); // 缓冲几何体
bufferGeometry.setAttribute("position", new THREE.BufferAttribute(new Float32Array(positionArr), 3));
bufferGeometry.setAttribute("originPosition", new THREE.BufferAttribute(new Float32Array(positionArr), 3));
bufferGeometry.setAttribute("normal", new THREE.BufferAttribute(new Float32Array(normalArr), 3));
bufferGeometry.setAttribute("uv", new THREE.BufferAttribute(new Float32Array(uvArr), 2));
bufferGeometry.faceAnimateArr = [];
for (let i = 0; i < bufferGeometry.attributes.position.count; i++) {
    // 三角面
    if (i % 3 == 0) {
        const y = bufferGeometry.attributes.position.array[i * 3 + 1];
        const y_sign = Math.sign(y);
        let obj = {
            circle: 1500, // 周期
            startTime: null, // 起始时间
            progress: 0, // 进度
            bezier: null, // 贝赛尔曲线
        };
        const start = { x: 0, y: 0, z: 0 }; // 起点
        const end = start; // 终点
        let control1 = { x: Math.random() * 50, y: y_sign * (Math.random() * 80), z: 0 }; // 控制点1
        let control2 = { x: Math.random() * 50, y: -y_sign * 20, z: 0 }; // 控制点2
        obj.bezier = { start, control1, control2, end };
        bufferGeometry.faceAnimateArr.push(obj);
    }
}

// 材质
const material = new THREE.MeshStandardMaterial({
    map: new THREE.TextureLoader().load(FILE_HOST + 'threeExamples/application/flyLine/earth.jpeg'),
    side: THREE.DoubleSide,
});

// 平面
const plane = new THREE.Mesh(bufferGeometry, material);
scene.add(plane);

// 贝塞尔曲线
function bezier(P0, P1, P2, P3, t) {
    const x = P0.x * (1 - t) * (1 - t) * (1 - t) + 3 * P1.x * t * (1 - t) * (1 - t) + 3 * P2.x * t * t * (1 - t) + P3.x * t * t * t;
    const y = P0.y * (1 - t) * (1 - t) * (1 - t) + 3 * P1.y * t * (1 - t) * (1 - t) + 3 * P2.y * t * t * (1 - t) + P3.y * t * t * t;
    const z = P0.z * (1 - t) * (1 - t) * (1 - t) + 3 * P1.z * t * (1 - t) * (1 - t) + 3 * P2.z * t * t * (1 - t) + P3.z * t * t * t;
    return { x, y, z };
}

// 碎片运动
let startTime = Date.now(); // 开始时间
const circle = 1500; // 周期
let progress = 0; // 进度
requestAnimationFrame(function h() {
    requestAnimationFrame(h);
    progress = (Date.now() - startTime) / circle; // 计算进度
    if (progress > 1) progress = 1;
    let startX = -width / 2;
    let currX = startX + width * progress;

    // 遍历三角面
    bufferGeometry.faceAnimateArr.forEach((face, index) => {
        const tArr = bufferGeometry.attributes.originPosition.array; // 类数组对象
        const face_firstVertex = { x: tArr[index * 3 * 3], y: tArr[index * 3 * 3 + 1], z: tArr[index * 3 * 3 + 2] };
        if (!face.startTime && face_firstVertex.x < currX) {
            face.startTime = Date.now();
        }

        if (face.startTime && face.progress < 1) {
            face.progress = (Date.now() - face.startTime) / face.circle;
            if (face.progress > 1) face.progress = 1;
            for (let i = 0; i < 3; i++) {
                const currVertexIndex = index * 3 + i;
                const originPos = { x: tArr[currVertexIndex * 3], y: tArr[currVertexIndex * 3 + 1], z: tArr[currVertexIndex * 3 + 2] }; // 原始位置
                const { start, control1, control2, end } = bufferGeometry.faceAnimateArr[index].bezier;
                const bezierPos = bezier(start, control1, control2, end, face.progress); // 计算贝塞尔点位置
                const newPos = { x: originPos.x + bezierPos.x, y: originPos.y + bezierPos.y, z: originPos.z + bezierPos.z };
                bufferGeometry.attributes.position.setXYZ(currVertexIndex, newPos.x, newPos.y, newPos.z); // 更新位置
            }
        }
    });
    plane.geometry.dispose();
    plane.geometry = bufferGeometry.clone();
});

// 循环
setInterval(() => {
    startTime = Date.now();
    progress = 0;
    bufferGeometry.faceAnimateArr.forEach((face) => {
        face.startTime = null;
        face.progress = 0;
    });
}, 4000);
完整源码:GitHub
小结
- 本文提供 颗粒图像 完整 Three.js 源码与在线 Demo,建议先运行案例再改 uniform/参数做二次实验
- 更多 Three.js 实战案例见 three-cesium-examples 合集 与 GitHub 开源仓库