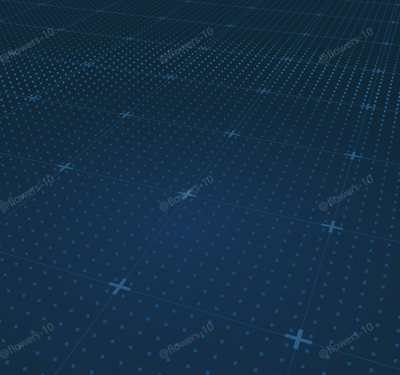
科技风地面 · TachnologyFloor · ▶ 在线运行案例
案例合集: 三维可视化功能案例(threehub.cn)
开源仓库github地址: https://github.com/z2586300277/three-cesium-examples
**400个案例代码: ** 网盘链接
你将学到什么
- onBeforeCompile 注入 GLSL 改造内置材质
- OrbitControls 相机轨道交互
- THREE.Points 粒子点渲染
- GSAP 时间轴与补间动画
- BufferGeometry 自定义顶点/索引数据
- 场景雾效增强纵深
requestAnimationFrame渲染循环与resize自适应
效果说明
本案例演示 科技风地面 效果:基于 WebGL 实现「科技风地面」可视化效果,附完整可运行源码;核心用到 onBeforeCompile、OrbitControls、THREE.Points。建议先打开文首在线案例查看动态画面,再对照下方源码逐步理解。
核心概念
- Scene / Camera / WebGLRenderer 构成最小渲染闭环;大场景可开
logarithmicDepthBuffer缓解 Z-fighting。 - onBeforeCompile 在 Three 拼好内置 shader 后替换
#include <xxx>片段,适合在 PBR 材质上叠加大屏特效。 - OrbitControls 提供轨道旋转/缩放;开启
enableDamping后需在 animate 中controls.update()。 - THREE.Points 将每个顶点渲染为可控大小的粒子;可用自定义 attribute(如
u_index)驱动片元/顶点动画。
实现步骤
- 搭建 Scene、PerspectiveCamera、WebGLRenderer,挂载 canvas 并处理
resize - 定义 uniforms / onBeforeCompile 或 ShaderMaterial,编写 GLSL 与材质参数
- 创建 OrbitControls(及 Raycaster 等交互控件,若源码包含)
- 在定时器或 GSAP 时间轴中更新 uniform / 变换,驱动特效播放
- 在
requestAnimationFrame循环中更新状态并 render(Cesium 为viewer.render或自动渲染)
代码要点
import * as THREE from 'three'
import { OrbitControls } from 'three/examples/jsm/controls/OrbitControls.js'
import { mergeGeometries } from 'three/examples/jsm/utils/BufferGeometryUtils.js'
import gsap from 'gsap'

const box = document.getElementById('box')

const scene = new THREE.Scene()

const camera = new THREE.PerspectiveCamera(45, box.clientWidth / box.clientHeight, 0.1, 100000)

camera.position.set(13, 12, 40)

const renderer = new THREE.WebGLRenderer({ antialias: true, alpha: true, logarithmicDepthBuffer: true })

renderer.setSize(box.clientWidth, box.clientHeight)

renderer.setClearColor(0x102736, 1) // 设置背景色

box.appendChild(renderer.domElement)

const controls = new OrbitControls(camera, renderer.domElement)
controls.enableDamping = true // 启用阻尼

window.onresize = () => {

    renderer.setSize(box.clientWidth, box.clientHeight)

    camera.aspect = box.clientWidth / box.clientHeight

    camera.updateProjectionMatrix()

}

scene.fog = new THREE.Fog(0x102736, 1, 50)

const opt = {
    gridSize: 50,
    gridDivision: 20,
    gridColor: 0x1b4b70, // 深蓝
    shapeSize: 0.5,
    shapeColor: 0x2a5f8a, // 深蓝
    // shapeColor: 0xf44336, // 红色
    pointSize: 0.1,
    pointColor: 0x154d7d, // 深蓝
    diffuse: true,
    diffuseSpeed: 10,
    diffuseWidth: 10,
    pointLayout: { row: 200, col: 200 },
    diffuseColor: 0x2e8bd9, // 蓝色
    pointBlending: THREE.NormalBlending,
    // diffuseDir: 1, // 扩散方向:0-圆形扩散,1-横向扩散
}

const oceanTexture = new THREE.TextureLoader().load(FILE_HOST + "/images/bluebg.png")
const floorGeometry = new THREE.PlaneGeometry(20, 20)
oceanTexture.colorSpace = THREE.SRGBColorSpace // 设置颜色空间
oceanTexture.wrapS = THREE.RepeatWrapping // 水平方向重复纹理
oceanTexture.wrapT = THREE.RepeatWrapping // 垂直方向重复纹理
oceanTexture.repeat.set(1, 1) // 设置纹理重复次数
const floorMaterial = new THREE.MeshBasicMaterial({
    map: oceanTexture,
    opacity: 1,
})
const floor = new THREE.Mesh(floorGeometry, floorMaterial)
floor.rotateX(-Math.PI / 2)
floor.position.set(0, -0.7, 0)
scene.add(floor)

// grid
const gridGroup = new THREE.Group()
gridGroup.name = 'Grid'

const gridHelper = new THREE.GridHelper(opt.gridSize, opt.gridDivision, opt.gridColor, opt.gridColor)

const cellSize = opt.gridSize / opt.gridDivision // 每个网格的大小
const halfGridSize = opt.gridSize / 2 // 网格的一半大小
const shapeMaterial = new THREE.MeshBasicMaterial({
    color: opt.shapeColor,
    side: THREE.DoubleSide,
})
// 创建加号几何体数组
const geometries = []

for (let row = 0; row < opt.gridDivision + 1; row++) {
    for (let col = 0; col < opt.gridDivision + 1; col++) {
        const lineWidth = opt.shapeSize / 6 / 3 // 宽
        const armLength = opt.shapeSize / 3 // 长

        // 加号形状的顶点
        const vertices = [
            new THREE.Vector2(-armLength, -lineWidth), // 外左下
            new THREE.Vector2(-lineWidth, -lineWidth), // 内左下
            new THREE.Vector2(-lineWidth, -armLength),
            new THREE.Vector2(lineWidth, -armLength),
            new THREE.Vector2(lineWidth, -lineWidth),
            new THREE.Vector2(armLength, -lineWidth),
            new THREE.Vector2(armLength, lineWidth),
            new THREE.Vector2(lineWidth, lineWidth),
            new THREE.Vector2(lineWidth, armLength),
            new THREE.Vector2(-lineWidth, armLength),
            new THREE.Vector2(-lineWidth, lineWidth),
            new THREE.Vector2(-armLength, lineWidth),
        ]
        const shape = new THREE.Shape(vertices)
        const plusGeometry = new THREE.ShapeGeometry(shape, 24)
        plusGeometry.translate(
            -halfGridSize + row * cellSize,
            -halfGridSize + col * cellSize,
            0,
        )
        geometries.push(plusGeometry)
    }
}
const mergedGeometry = mergeGeometries(geometries)
const shapeMesh = new THREE.Mesh(mergedGeometry, shapeMaterial)

shapeMesh.renderOrder = -1
shapeMesh.rotateX(-Math.PI / 2)
shapeMesh.position.y += 0.01

// 创建散点几何体和材质
const rows = opt.pointLayout.row // 点阵行数
const cols = opt.pointLayout.col // 点阵列数
const pointVertices = new Float32Array(rows * cols * 3) // 顶点数组

// 生成点阵
for (let row = 0; row < rows; row++) {
    for (let col = 0; col < cols; col++) {
        const x = (row / (rows - 1)) * opt.gridSize - opt.gridSize / 2
        const y = 0
        const z = (col / (cols - 1)) * opt.gridSize - opt.gridSize / 2

        const index = (row * cols + col) * 3
        pointVertices[index] = x
        pointVertices[index + 1] = y
        pointVertices[index + 2] = z
    }
}
const pointGeometry = new THREE.BufferGeometry()
pointGeometry.setAttribute(
    'position',
    new THREE.BufferAttribute(pointVertices, 3),
)

const pointMaterial = new THREE.PointsMaterial({
    color: opt.pointColor,
    size: opt.pointSize,
    blending: opt.pointBlending,
})

const points = new THREE.Points(pointGeometry, pointMaterial)

let shaderProgram = null
if (opt.diffuse) {

    // 给材质添加着色器
    pointMaterial.onBeforeCompile = shader => {
        shaderProgram = shader
        // 添加自定义 uniform 变量
        shader.uniforms = {
            ...shader.uniforms,
            uTime: { value: 0 },
            uSpeed: { value: opt.diffuseSpeed },
            uWidth: { value: opt.diffuseWidth },
            uColor: { value: new THREE.Color(opt.diffuseColor) },
            uDir: { value: 0 }, // 扩散方向:0-圆形扩散,1-横向扩散
        }

        // 修改顶点着色器,添加变量传递
        shader.vertexShader = shader.vertexShader.replace(
            'void main() {',
            `
          varying vec3 vPosition;
          void main() {
            vPosition = position;
          `,
        )

        // 修改片元着色器,添加变量声明
        shader.fragmentShader = shader.fragmentShader.replace(
            'void main() {',
            `
          uniform float uTime;
          uniform float uSpeed;
          uniform float uWidth;
          uniform vec3 uColor;
          uniform float uDir;
          varying vec3 vPosition;

          void main() {
          `,
        )

        // 实现扩散效果的着色器代码
        shader.fragmentShader = shader.fragmentShader.replace(
            '#include <opaque_fragment>',
            `
          #ifdef OPAQUE
          diffuseColor.a = 1.0;
          #endif

          #ifdef USE_TRANSMISSION
          diffuseColor.a *= material.transmissionAlpha;
          #endif

          // 计算扩散半径
          float radius = uTime * uSpeed;

          // 光环宽度
          float width = min(uWidth, uTime * 5.0);

          // 几何中心点
          vec2 center = vec2(0.0, 0.0);

          // 距离圆心的距离
          float distanceFromCenter = 0.0;

          // 根据扩散方向决定使用的坐标和计算方式
          if(uDir == 1.0) {
            // 横向扩散 - 只考虑x轴方向
            distanceFromCenter = abs(vPosition.x);
          } else {
            // 圆形扩散 - 考虑xz平面
            distanceFromCenter = distance(vPosition.xz, center);
          }

          // 光环扩散效果实现
          if(distanceFromCenter > radius && distanceFromCenter < radius + 2.0 * width) {
            float percentage = 0.0;

            if(distanceFromCenter < radius + width) {
              // 内圈渐变
              percentage = (distanceFromCenter - radius) / width;
              outgoingLight = mix(outgoingLight, uColor, percentage);
            } else {
              // 外圈渐变
              percentage = (distanceFromCenter - radius - width) / width;
              outgoingLight = mix(uColor, outgoingLight, percentage);
            }

            gl_FragColor = vec4(outgoingLight, diffuseColor.a);
          } else {
            gl_FragColor = vec4(outgoingLight, diffuseColor.a);
          }
          `,
        )
    }

    // 添加时间更新
    const resetTime = opt.gridSize / opt.diffuseSpeed

    const clock = new THREE.Clock()
    points.render = () => {
        if (shaderProgram) {
            shaderProgram.uniforms.uTime.value += clock.getDelta() // 增加时间
            // 当时间超过一定值时重置,形成循环动画
            if (shaderProgram.uniforms.uTime.value > resetTime) {
                shaderProgram.uniforms.uTime.value = 0
            }
        }

    }

}
gridGroup.add(gridHelper, shapeMesh, points)
scene.add(gridGroup)

animate()

function animate() {

    if (points.render) {
        points.render() // 调用自定义渲染方法
    }
    requestAnimationFrame(animate)
    controls.update()
    renderer.render(scene, camera)

}

const timeLine = gsap.timeline()
timeLine.add(
    gsap.to(camera.position, {
        duration: 2.5,
        x: -20.460391656828197,
        y: 19.30487264306655,
        z: 58.37802626943616,
        ease: 'circ.out',
    }),
)

timeLine.add(
    gsap.to(camera.position, {
        duration: 2.5,
        x: -0.2515849818960619,
        y: 12.397744557047988,
        z: 14.647659671139275,
        ease: 'circ.out',
    }),
)
完整源码:GitHub
小结
- 本文提供 科技风地面 完整 Three.js 源码与在线 Demo,建议先运行案例再改 uniform/参数做二次实验
- 更多 Three.js 实战案例见 three-cesium-examples 合集 与 GitHub 开源仓库